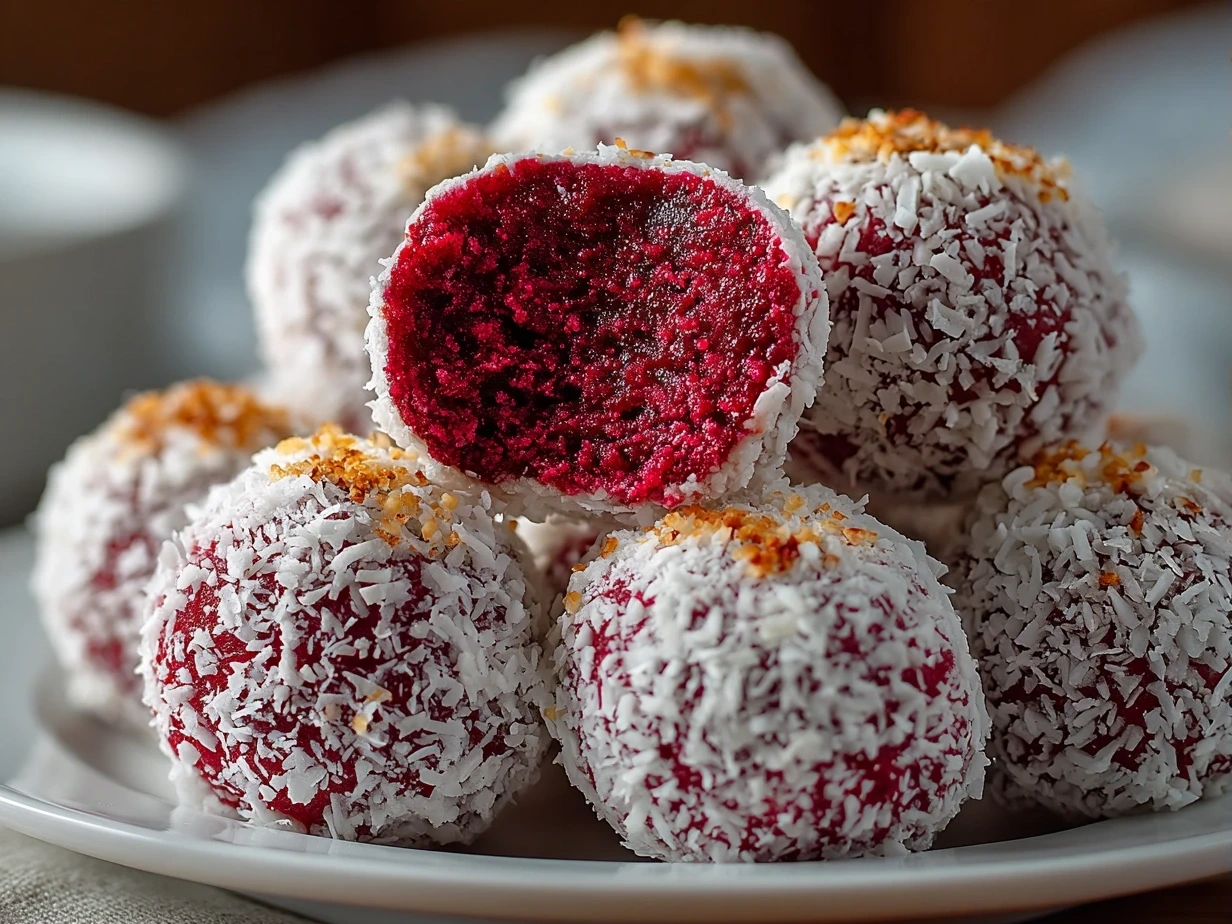
I still remember the first time I tried No-Bake Red Velvet Snowball Truffles. A close friend brought them over during a winter holiday gathering, and they immediately stole the show. The rich, velvety red velvet flavor combined with the delicate powdery coating felt like a cozy hug on a chilly evening. It was effortless but tasted like something you’d find at a fancy bakery, which made me fall for them completely. Since then, I’ve made these truffles a centerpiece for my own seasonal get-togethers and even quick weeknight treats.
What makes No-Bake Red Velvet Snowball Truffles special is their simplicity paired with such inviting flavor. You don’t have to light up your oven or prep complicated doughs. Plus, they’re made with everyday ingredients, making them a staple for anyone who wants an impressive, delicious no-bake dessert ball on the table fast. They work beautifully for both weekday desserts and festive winter holiday truffles, fitting seamlessly into any occasion.
If you love easy no-bake treats that still bring that smile and maybe even a little nostalgia, you’re in the right place. This red velvet truffle recipe is friendly for all skill levels and doesn’t demand anything tricky. I’ve tested it countless times and refined it so it’s always reliable and always delicious. Whether you’re making snowball truffles dessert for your family or a bigger crowd, this recipe has your back. So let’s dive in, fellow cooks. You’re going to love sharing these, and I can’t wait to hear how yours turn out.
What You’ll Need:
Here’s the ingredient list for your No-Bake Red Velvet Snowball Truffles. These are all pretty straightforward and pantry-friendly.
- 8 ounces cream cheese, softened
- 2 cups finely crushed red velvet cake crumbs (store-bought or homemade)
- 1 ½ cups powdered sugar
- 1 teaspoon vanilla extract
- 2 cups white chocolate chips
- 1 cup finely grated coconut or extra powdered sugar for coating
No problem if you don’t have red velvet cake crumbs on hand—I’ve swapped in finely crushed red velvet cookies or even a touch of cocoa powder mixed with plain crumbs and it worked just fine for my No-Bake Red Velvet Snowball Truffles. Look for white chocolate chips in your standard baking aisle—they’re usually easy to find and an affordable choice here.
Using store-bought cake crumbs can save you a lot of time; just pop your cake in a quick pulse in the food processor, and you’re set. If you want to keep it budget-friendly, homemade crumbs from day-old cake work beautifully and reduce waste.
Here’s a kitchen tip: soften your cream cheese ahead of time by letting it sit at room temperature for 30 minutes or microwaving it for 10 seconds. This will make your mixing stage smoother and speed up the whole process.
If you happen to have leftovers, no worries—the truffles store perfectly. Keep them in an airtight container in the refrigerator for up to a week. They’re a handy snack ready whenever you need a little sweetness.
My secret? I like to add an extra splash of vanilla extract. It smooths out the tang of cream cheese and enhances the richness without overpowering those classic No-Bake Red Velvet Snowball Truffles flavors.
Let’s Cook It Together!
Making these No-Bake Red Velvet Snowball Truffles is as straightforward as it gets, perfect for any home cook. Here’s how I do it, step by step:
- Mix the cream cheese and powdered sugar in a large bowl until smooth. Use a hand mixer or just vigorous whisking—this is where your No-Bake Red Velvet Snowball Truffles start to get that creamy, sweet base. It usually takes me about 3-5 minutes until the mix feels silky.
- Fold in vanilla extract to add a cozy depth. This part always perks up the flavor and smells fantastic in your kitchen.
- Add the red velvet cake crumbs little by little and mix gently. You want everything combined but still maintaining a bit of texture. If it feels too sticky, pop it in the fridge for 10-15 minutes. When it’s firm enough to roll without sticking all over your hands, you’re good to go.
- Shape your truffles by scooping tablespoon-sized portions of the mixture and rolling them into balls. I find damp hands help prevent sticking here. This is always a fun stage—it’s hands-on and feels rewarding to watch those vibrant red balls take form.
- Melt your white chocolate chips in a microwave-safe bowl using 30-second bursts, stirring between each, until smooth. This step coats your truffles, giving No-Bake Red Velvet Snowball Truffles their lovely shell and extra sweetness.
- Dip each ball into the melted white chocolate, letting the excess drip off before setting them on parchment paper. You want a thin, even layer to fully cover the truffles.
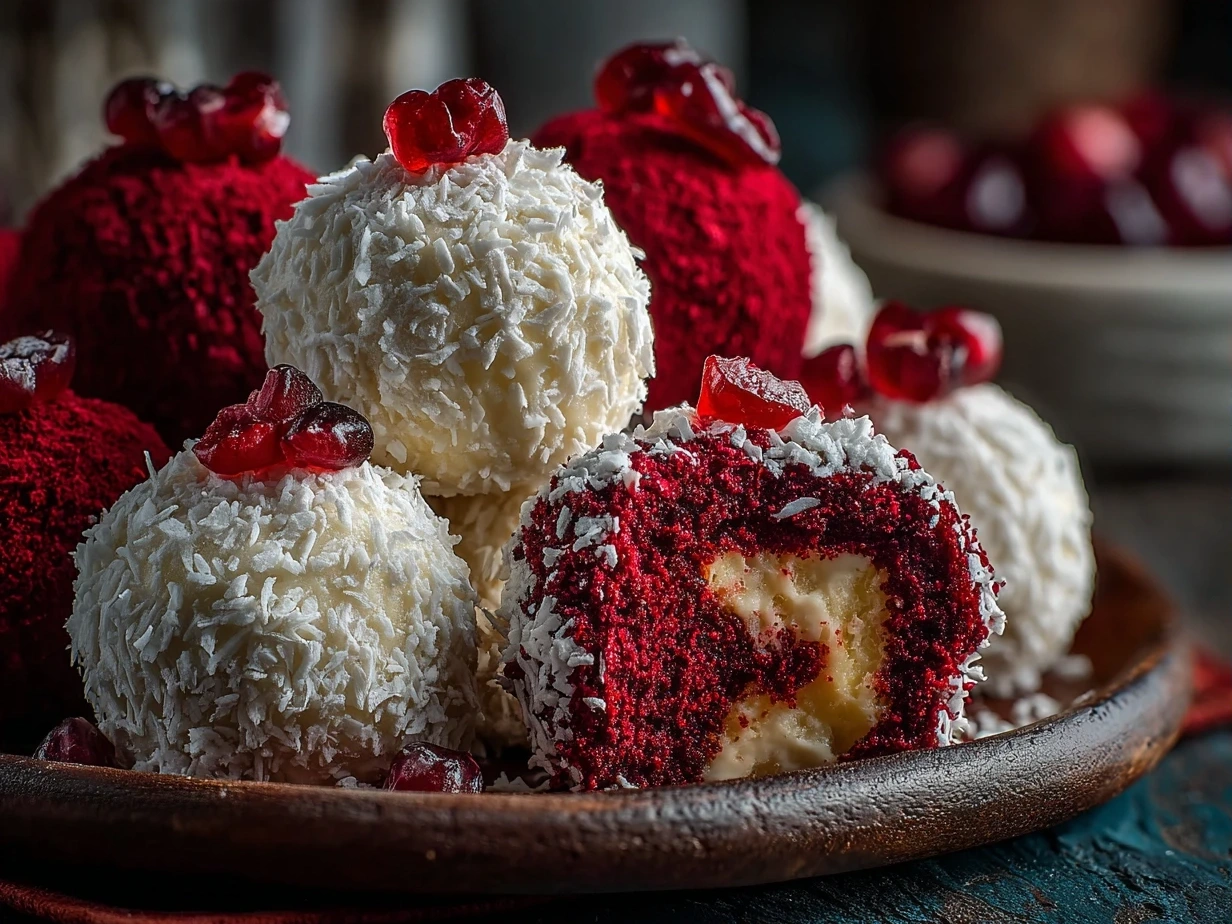
- Roll the coated truffles in grated coconut or powdered sugar. This final step gives your snowball truffles dessert that signature soft, snowy look. Plus, it adds a bit of fun texture.
From start to finish, this No-Bake Red Velvet Snowball Truffles recipe takes me about 45 minutes, including chilling and dipping time. While the white chocolate melts, it’s a good moment to tidy up or prepare your serving tray.
If you notice your coating gets too thick or clumpy, warm your white chocolate gently again—it tends to seize if it cools too much. Don’t rush this part; your patience will shine in those smooth, glossy truffles.
A trick I’ve learned is to place the finished truffles in the fridge for at least an hour. That helps them firm up, making them easier to handle and eat without melting too quickly.
If this sounds like fun, you might also like some other easy no-bake treats like these tasty grilled rice balls I often turn to for a quick snack (easy yaki onigiri) or Brazilian Mounjaro, a delightful no-bake dessert (brazilian mounjaro recipe).
How to Serve & Enjoy It!
No-Bake Red Velvet Snowball Truffles shine when shared. I usually set them out on a pretty plate or in cupcake liners to keep things tidy. Their snowy look always adds a festive feel to any table.
These truffles are perfect for winter holiday truffles at parties and family gatherings where you want something sweet but light and bite-sized. The balance of creamy, crumbly red velvet with the white chocolate coating makes them a crowd-pleaser every time.
Pairing these snowball truffles dessert with a hot chocolate or a simple black coffee really balances their sweetness. For a winter spice twist, a cinnamon tea or lightly spiced chai works beautifully too.
Serving tip: sprinkle a few fresh cranberries or mint leaves around the tray for color contrast that makes your No-Bake Red Velvet Snowball Truffles look even more inviting. Simple touches like this always get noticed.
If you happen to have leftovers, slice one carefully in half and use it as a sandwich filling between graham crackers or spread on a warm croissant for a fun dessert twist. Another easy idea is to crumble extra truffles over vanilla ice cream—instant festive sundae!
This red velvet truffle recipe is flexible for celebrations beyond the holidays too. Switch the white chocolate coating to milk or dark chocolate for different flavor profiles, or toss in some crushed peppermint candies instead of coconut for a personal twist.
Guest reactions to my No-Bake Red Velvet Snowball Truffles are usually a mix of surprise and delight. They often ask for the recipe or want to know where I bought such a fancy dessert. It’s always a happy moment!
If you enjoy this, you might also appreciate the ease and flavor of Valentine’s Day Oreo Truffles—a fantastic easy no-bake dessert family favorite (Valentine’s Day Oreo Truffles).
Your Questions Answered
Can I make this No-Bake Red Velvet Snowball Truffles ahead of time?
Absolutely! These truffles actually taste better after chilling overnight because the flavors meld. Store them covered in the fridge, and they’ll stay fresh for up to a week.
What’s the best substitute for cream cheese?
You can swap cream cheese for mascarpone or even Greek yogurt (strained) for a lighter twist. Just know it might change the texture slightly but still keep that tangy edge.
Can I use bittersweet or dark chocolate instead of white chocolate?
Yes, definitely! I’ve made these with dark chocolate for a richer coating. Just melt and dip as usual—your No-Bake Red Velvet Snowball Truffles will get a deeper chocolate flavor.
How do I scale this recipe for more servings?
Simply double or triple ingredients as needed, but keep your mixing bowl large enough to avoid mess. Rolling the truffles gets a bit time-consuming with bigger batches but still quite doable.
Can I freeze these truffles?
Yes, you can freeze them in a single layer on a tray for a couple of hours, then transfer to airtight containers with parchment between layers. They thaw quickly in the fridge and keep their shape and flavor well.
What if my mixture is too crumbly or too wet?
If too crumbly, add a bit more softened cream cheese. If too wet, add extra cake crumbs or powdered sugar slowly until the right consistency forms for rolling.
Can I make them vegan or dairy-free?
I’ve tried swapping with vegan cream cheese and dairy-free white chocolate chips and the No-Bake Red Velvet Snowball Truffles still worked well. Just check your ingredients for good melting performance.
If you want a variety of no-bake dessert balls to try next, check out these 21 Easy No-Bake Truffles Recipes that include lots of fun flavors and styles.
Final Thoughts
This No-Bake Red Velvet Snowball Truffles recipe is one of those dependable, cozy treats that always brings a smile. It earns a permanent spot in my collection because it’s delicious, approachable, and fits into so many real-life moments. Whether it’s for a casual family snack, a winter holiday table, or a last-minute dessert, it delivers every time.
My Best No-Bake Red Velvet Snowball Truffles Tips:
– Always soften your cream cheese well—this little step smooths out your mixture for easier rolling.
– Don’t rush the cooling and dipping of the truffles. Patience here gives you that lovely smooth coating.
– Use a variety of coatings like coconut, powdered sugar, or crushed candy to customize texture and flavor.
I’ve tested several variations—coating the truffles in crushed pistachios for a nutty flavor, swapping to milk chocolate instead of white, and even folding mini chocolate chips inside the mix before rolling. The white chocolate-coated version stays the most requested, but I encourage you to make it your own.
If your family loves this, they’ll also enjoy crowd-pleasers like homemade mayonnaise for sandwiches (Homemade Mayonnaise Easy Creamy Recipe) or other simple desserts that show you don’t need fancy techniques to impress.
I hope these No-Bake Red Velvet Snowball Truffles bring a little joy and ease to your kitchen. Give it a try and share what you discover—it’s a sweet little win I believe every home cook deserves. You’ve got this!
For more sweet inspiration and recipes that keep the joy in everyday cooking, check out the article on easy winter holiday truffles and simple no-bake desserts from Taste of Home (From no-bake fudge and truffles to spiced cakes and chewy cookies).
No-Bake Red Velvet Snowball Truffles
Delight in these easy no-bake red velvet snowball truffles, combining classic red velvet cake flavors with creamy frosting, coated in powdered sugar for a festive treat.
- Prep Time: 15 minutes
- Cook Time: 0 minutes
- Total Time: 45 minutes
- Yield: 20 truffles
- Category: Dessert
- Method: No-Cook
- Cuisine: American
Ingredients
- 1 cup red velvet cake crumbs
- 4 oz cream cheese, softened
- 1 cup powdered sugar, divided
- 1/2 teaspoon vanilla extract
- 1/4 cup white chocolate chips (optional)
Instructions
- In a medium bowl, combine red velvet cake crumbs and softened cream cheese until fully mixed and smooth.
- Stir in vanilla extract until incorporated.
- Shape the mixture into 1-inch balls and place them on a parchment-lined tray.
- Freeze the balls for 20 minutes to firm up.
- Melt white chocolate chips if using, and dip each ball into the chocolate, then place back on parchment paper. Allow chocolate to set.
- Roll each truffle in powdered sugar until fully coated, creating the snowball effect.
- Refrigerate the truffles for at least 30 minutes before serving.
Notes
For extra flavor, try rolling the truffles in crushed freeze-dried raspberries before the powdered sugar coating.